It’s Da Jam – Bacon Jam To Be Precise

IMG_3321.JPG

I know.

I know.

Oh. I know.

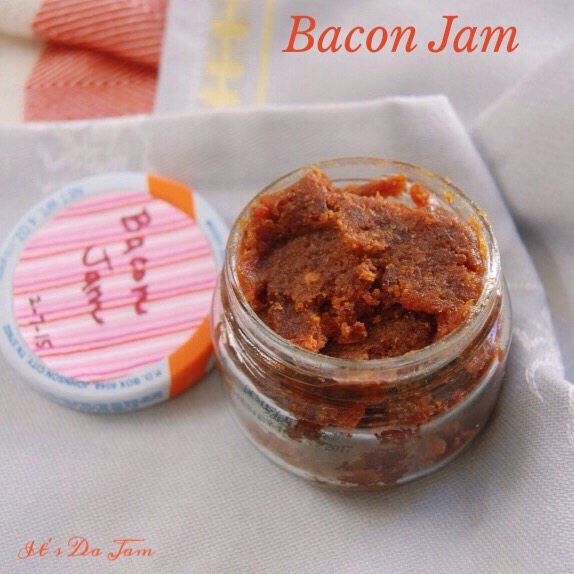
Have you ever had bacon jam? I had had it two times in the last ten years before I decided to make my own. I just kept waiting for a restaurant near me to have it on the menu or wait to stumble upon it in a store. But it never happened. And my soul was sad from the wanting of it. It tastes like a sweet and smoky intense bacon spread. It is slap-your-own face-as-you-drool good.

So, the other day I decided to just google a recipe. It turns out that bacon jam is a snap to make. If you can manage to not eat all of the bacon before putting it into your crock pot. I do believe that is why this recipe calls for one and a half pounds of bacon. We all know bacon comes in one pound packages. So, you will need to buy two packages. Little Miss Martha Stewart (from whom this recipe is from, I just changed a few ingredients and altered a few steps) must have not been able to resist that other half a pound of bacon, either. And who can blame her?

The best part about this recipe, besides the heavenly taste, is that it is made in the crockpot. Can I hear a hallelujah? Or is your throat still sore from the delightful screams of the very idea of bacon jam? I hear ya. It is pretty darn wonderful.

Ingredients:

1 1/2 pounds of bacon
1 diced onion
1 minced clove of garlic (or 1 of those frozen packets)
2 Tbsp. of red pepper spread (Trader Joe’s carries one and most grocery stores carry a version)
1 tsp. red pepper flakes
1/2 cup organic brown sugar
1/2 cup apple cider vinegar
3/4 cup brewed coffee
1 Tbsp. Brandy
1/4 cup good maple syrup

Directions:

This recipe is going to take about six hours to make. It is definitely not hard. Basically, you just need to be able to stir it every so often in the crockpot. But plan to be home during the time of its creation. You cannot leave it and go.

Line a baking sheet with foil and line the foil with one layer of bacon closely touching each other but not overlapping. Place in a cold oven. Turn oven to 375 degrees F. Bake the bacon for 20-23 minutes. You want it crunchy but not burnt. Once the bacon is done, remove to a paper towel-lined towel. Repeat until all of the bacon is cooked.

IMG_3306.JPG

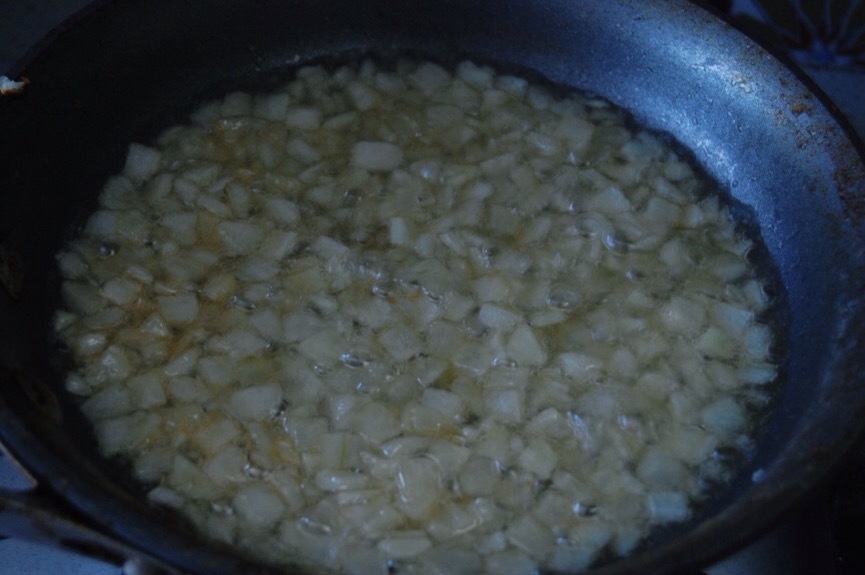
In a small skillet add three tablespoons of the bacon grease. Turn stovetop burner to medium heat. Add diced onion. Sauté for seven minutes. Add garlic. Cook an additional minute. Drain bacon fat from cooked onions and garlic. Add onions and garlic to the crockpot.

IMG_3315.JPG

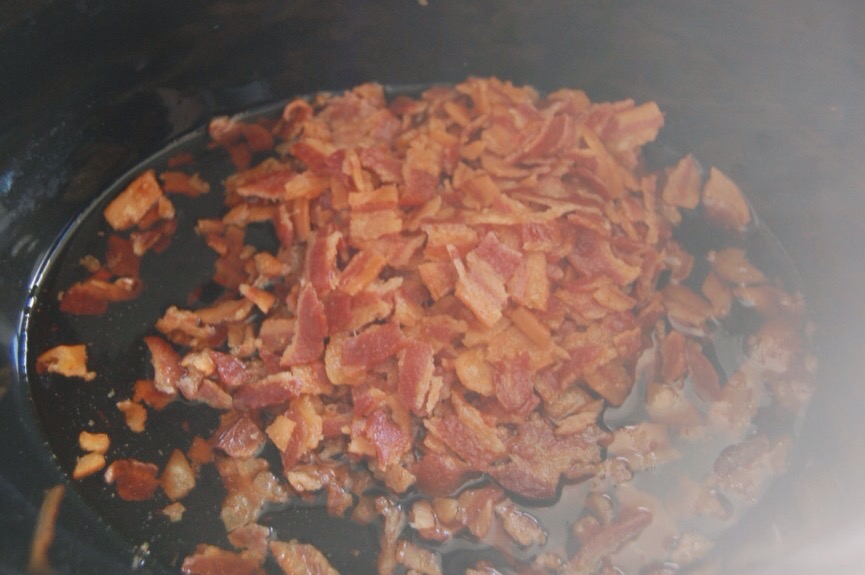
Add coffee, brown sugar, vinegar, maple syrup, brandy, and red pepper spread to the crockpot. Crumble bacon pieces into the crockpot. Add red pepper flakes. Stir.

IMG_3312.JPG

Cover crockpot and cook mixture for two hours on high (stirring every thirty to forty five minutes).

IMG_3310.JPG

Uncover and cook an additional two and a half hours uncovered (stirring every thirty minutes) until thick.

IMG_3313.JPG

Turn off the crockpot. Skim any fat off of the top of the bacon jam. I just take a spoon and quickly go over it. At this point you can add the jam to your food processor to blend it or just use a handy dandy immersion blender like me. I just pulse it directly in the crockpot with my immersion blender for about a minute. Stir. If there is more grease on top, skim it off. Let jam cool. And now put it in an air tight container.

IMG_3320.JPG

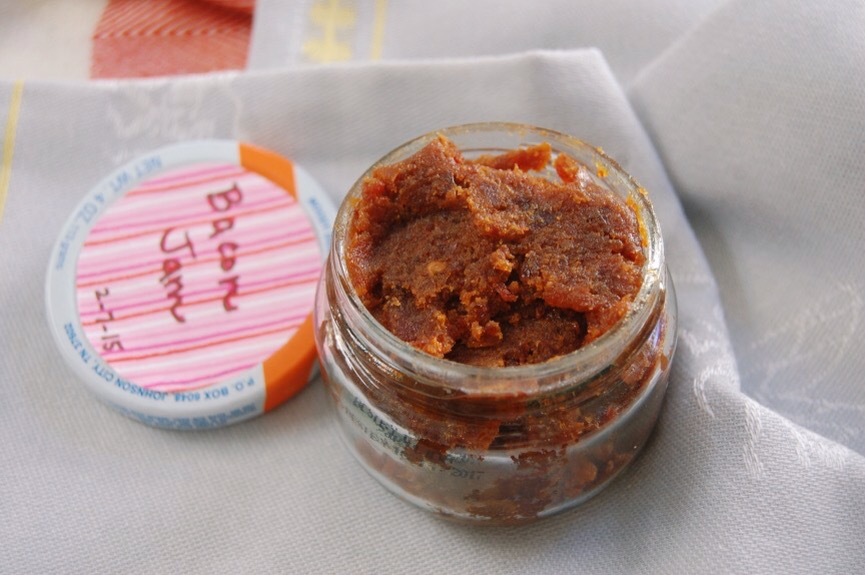
It fits perfectly in a 16 oz. container or you can put it in cute little glass jars. I reuse my pimento jars, starbucks frappucino jugs, and sundried tomato jars for such purposes. I like to quickly make a label with old scrap paper and mark it with a sharpie when I start the jam with the date on it so I know when I need to use it by. These would make great little gifts. Put the jar of jam in the refrigerator until ready to use. I use mine within two weeks stored in the refrigerator (although Martha Stewart suggests it might keep for four weeks, I worry about food safety).

IMG_3307.JPG

This is amazing on crostini, turkey sandwiches (my favorite thing in the world, recipe below), hamburgers, as a pizza sauce, with brie on crackers, on steaks, eggs, biscuits, fingers… You name it. It is delicious on it. I just reheat a little of it in the microwave for twenty to thirty seconds when I am ready to use it.

IMG_3308.JPG

IMG_3304.JPG

IMG_3305.JPG

IMG_3316.JPG

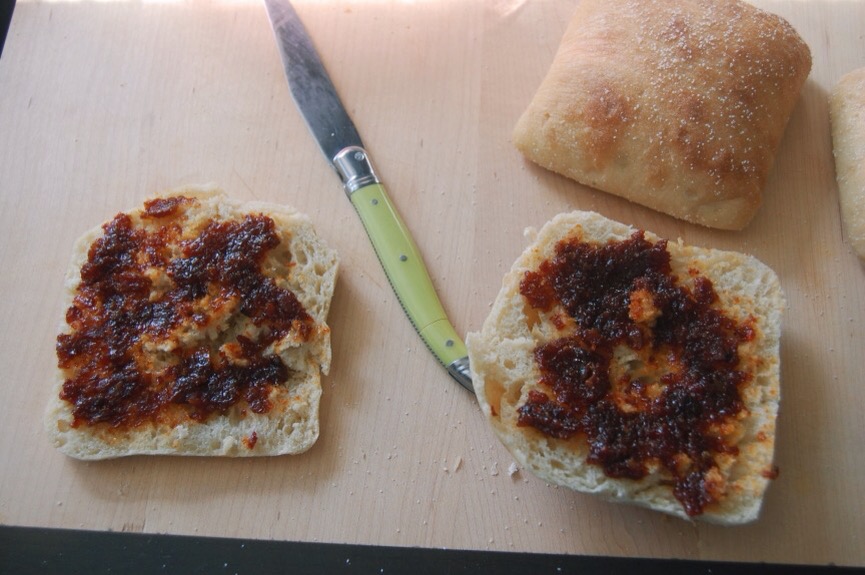
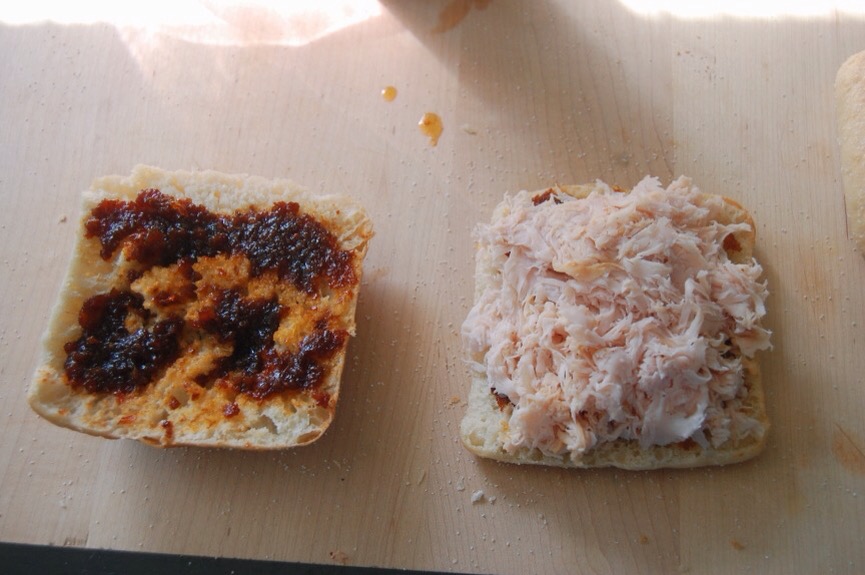
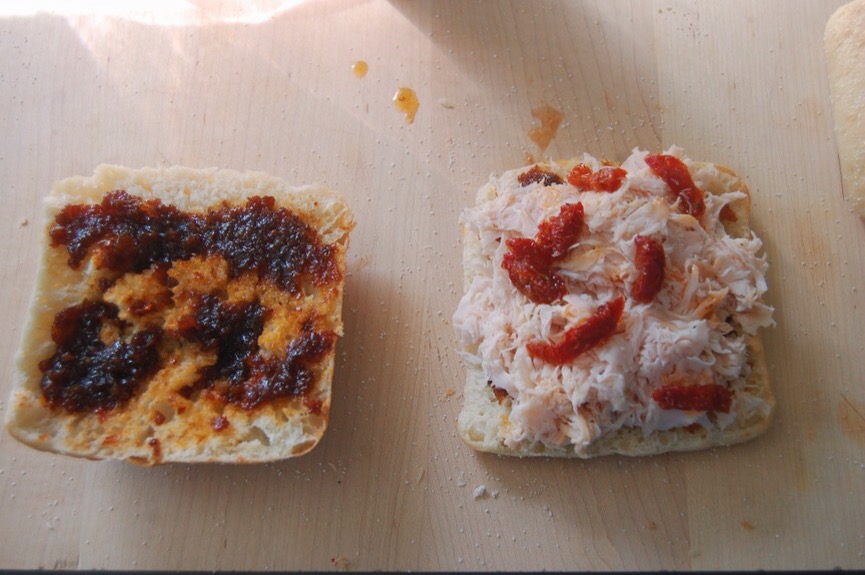
For the turkey sandwich that I love, I heat up the amount of bacon jam I want for fifteen to thirty seconds depending upon how many sandwiches I am making. I layer bacon jam on both sides of a Chibatta roll I have cut in half. Layer a good amount of good quality turkey on the bottom part of the roll (I use shaved honey turkey from the deli). Place a scattering of sundried tomatoes that were in oil on the turkey. Lay one slice of havarti cheese on top. Close up that baby and enjoy! If your throat is still raw from the screams, bacon jam will soothe it. It is kind of miraculous stuff. At least that’s what I keep telling myself.

Hallelujah!

Nutella Whoopie Pie Cookies

20140423-171232.jpg

I know.

It is at this point that you are probably wondering if I am sticking to my diet. The answer is, “yes.”

“How?” I can hear you wonder.

Well, I do not recommend that you do what I do. But let’s just say, a cookie for lunch ain’t somethin’ I’m new to.

You, of course, could eat some carrots, too.

I won’t.

But you could.

Priorities, peeps.

I recently shared my Peanut Butter Nutella Cookie recipe here. These are very similar. One day, I thought, Hey, Jenni. Why don’t you add all Nutella and skip the peanut butter?

So I did.

Only… While the rest of my family liked the cookies just fine. Well, I thought to myself, Self. These are still needin’ somethin’.

What if you added frosting? Self, what if you made a cookie sandwich and put the frosting in the middle?

Then when someone asks you what you had for lunch, you can say, ‘a sandwich.’ And nobody will be the wiser.

So I did.

If you cannot tell by now, that voice pretty much makes all of the decisions in my life. I am not sure… But, you guys, I think it is coming from my thighs.

The voice is booming. And it’s kinda shaky.

And that is why I am writing this recipe and not doing laundry.

And that is why I had a sandwich for lunch.

And that is why I am happy.

On to the happiness:

Ingredients:

1 tsp. vanilla extract
1/2 tsp. salt
1 tsp. baking soda
1 stick (1/2 cup) softened salted butter
1 egg
1 and 3/4 cups flour
2 Tbsp. cocoa powder
2 Tbsp. Milk
2/3 cup chocolate hazelnut spread (I use Nutella)
Caviar from one vanilla bean (if you do not have this, you can use 1/2 more tsp. vanilla extract)
1/2 cup melted semi-sweet chocolate chips
1/2 Tbsp. Cold brewed coffee
1/2 cup granulated sugar
1 cup organic brown sugar (organic brown sugar is so much better. I am not part of the organic movement, but I will not buy anything else.)

Ingredients for frosting (you have options here):

1 can of cream cheese or vanilla frosting

Or

Nutella

Or my favorite: I chose to use this recipe for most of my cookies. You will need: 5 Tbsp. Flour, 1 cup milk, 1 tsp. vanilla, 1 cup butter, 1 cup granulated sugar. It is a surprisingly easy and delicious frosting.

Or

Marshmallow fluff

Directions:

Preheat your oven to 350 degrees. Or 325 degrees Convect Bake if you have a convection oven.

Pour the 1/2 cup granulated sugar in a separate bowl and set aside while you work on the following.

20140418-210831.jpg

In a bowl with a hand mixer or in your bowl on your stand mixer, beat butter and brown sugar until light. Stop mixer and add in your vanilla and vanilla bean caviar. Mix.

20140418-210859.jpg

Now add Nutella, melted chocolate chips and coffee and mix together until completely incorporated.

Add the milk and mix.

Add the egg and mix until light and fluffy.

Turn mixer to low and add in salt, cocoa powder and baking soda. Mix until incorporated.

20140423-171445.jpg

Add flour and mix.

20140418-211011.jpg

20140418-211037.jpg

Turn off mixer. Now take a small ball of cookie dough and roll it on your hands. Drop the ball into the bowl of granulated sugar and gently roll it around.

20140423-171528.jpg

Place the ball of dough on a baking sheet. Repeat this step until your baking sheet is filled with cookie dough balls evenly spaced apart.

20140423-171617.jpg

With a fork, make two flat indentations onto each cookie.

With a spoon, scoop up some of the granulated sugar and pour a little sugar over marks left from the fork.

20140423-171753.jpg

Place baking sheet into the oven and bake for 10-11 minutes until edges are just a little brown. Do not cook longer. You do not want these overcooked.

Transfer baked cookies to a cooling rack.

Repeat with remaining dough. Turn oven off.

Let the cookies cool.

20140423-171847.jpg

For these cookies, I opted to make the best frosting to put between them. This version tasted like a homemade Oreo. Frost one backside of a cookie. Place the backside of another cookie against the frosting.

You made a sandwich!

Now eat your lunch!

20140418-211451.jpg

I also did a pure Nutella Whoopie Pie (the cookie appears lighter because I forgot the melted chocolate chips in this batch. Doh!) by spreading Nutella in between the cookie layers.

Gosh. I love that voice inside my thighs head.

And that voice loves…

Ryan Gosling Sandwiches.

Oh! But what about a Ryan Gosling Sandwich?

Self. You’ve gone too far. Eat your cookie.

20140506-165810.jpg

P.S. I shared this on Savvy Southern Style.

And My Romantic Home.

Melissa d’Arabian’s Three Cheesesteak Sandwiches

I have made this recipe two times before and loved it. I have never had a philly cheesesteak sandwich, but in my imagination it is very similar to this recipe.

Click here for the link to the original recipe.

I use frozen diced onions, because I do not like big pieces of onion, and because I am lazy and like to eliminate steps. I also omit the mushrooms, which gives us three sandwiches instead of four. This is enough to feed our family of four. If you have a larger family, I would recommend doubling the recipe.

I bought a package of boneless New York strip steak on sale today. This recipe calls for 3/4 pound of meat. I used 1/3 of the package and froze the rest for another meal next week, ’cause I’m thrifty like that.

Here is a picture of my ingredients with the steak seasoning all ready mixed together with my fork (no, I was not indulging in a raw meat fetish). I forgot to include a picture of the worchestire sauce, but it knows it is always in my heart.

20130311-152632.jpg

So, here is what it looks like when it is all put together and beautiful in its creamy decadence. Okay, maybe it is not all that pretty. But since this momma birthed it, it is beautiful to me. I starved all day to be able to eat this sandwich and it was totally worth it! Well, I had coffee, a banana and 3 girl scout cookies, like every grown woman naturally does.

20130311-152838.jpg

I served this with my family’s favorite salad (a bag of romaine with 1/3 cup feta cheese, 1/3 cup italian dressing and a little diced red bell pepper). I am going to be honest. My husband and I adore this sandwich, but my kids not so much. They take the steak off of the sandwich and just eat the meat on the side, completely wasting the bread. At least they loved the salad. If you have picky kids I do not know if they will enjoy this.

20130311-152922.jpg

20130311-153135.jpg

If you do decide to make this, let me know how it turns out! I think it is very easy and it took me about 25 minutes from prep to table. Thank you Melissa d’Arabian for this fantastic recipe.

And if you have ever had a real Philly Cheesesteak sandwich, let me know how it compares. My imagination thanks you!

Total cost for dinner: $13.22 (I do not include breakdowns for spices or garlic ’cause they are too inexpensive to waste time calculating)

1/4 package feta for salad $ .63
Bell pepper for salad & dinner $1
Onions $0 (I will explain why in my grocery budget post on Thursday)
Salad I purchased last week $2
Salad dressing .25
A little over 1 lb. Steak $5.60
2 slices american cheese .25
1/2 bag shredded mozarella $1
Rolls $1.74
1/2 block cream cheese .75 (I will use the other 1/2 tomorrow)