The Lazy Mom’s Salad

Who knew? Who knew my kids would have a fondness for spinach? Certainly not me.

I did not try spinach until about five years ago. I was terrified of the stuff. Here is what I knew about spinach that prevented me from trying it:

When eaten your body would become grossly disfigured causing monstrous veiny muscles to spontaneously burst out upon your arms.

When cooked it would shrivel away into a slimy green paste that resembled nothing of its former self.

It is green.

So I stayed clear of spinach. No thank you. “Olive Oil go rescue yourself and stop being so annoying. And, no, I am not eating spinach. Especially to save you.” There I said it. Oh, you know you were thinking it.

20140119-225944.jpg

But I tried it as a salad. I loved it. It is so velvety and mild. I thought perhaps my children would love it, too.

And they did.

And they do.

More than me.

More than my husband.

More than Pop…

No, not more than him. Their bodies don’t combust for the stuff.

Thank God.

I won’t make a salad unless it is easy. Dinner is all ready so time consuming. Here is how I always make my salad, 3-4 times a week. We never get tired of it.

Ingredients:

5 – 6 oz. of prewashed baby spinach (best flavor I have found is Safeway or Vons O Organic) or prewashed romaine lettuce
1/3 cup Italian dressing (whichever is cheapest)
1/3 cup feta cheese

Optional for the less lazy:

Chopped red bell pepper
Chopped sun-dried tomatoes

Directions:

20140119-225402.jpg

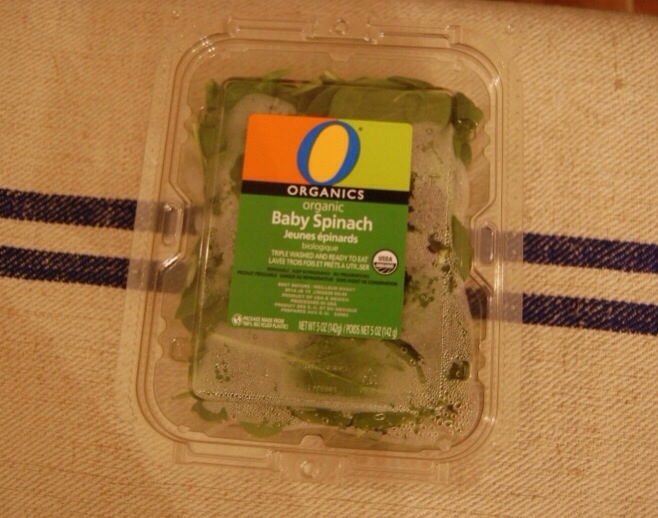
Dump salad in a bowl. Sorry. Forgot to take a picture of it in the bowl. But here it is before that step. All innocent. It doesn’t even know what’s going to happen to it.

20140119-225450.jpg

Measure feta. Dump feta in the bowl.

20140119-225536.jpg

Measure Italian dressing. Dump the dressing in the bowl. Toss.

And try not use the word dump while you are cooking. Just a thought. A suggestion. Don’t take offense or poke my eye out! “A-ga-ga-ga-ga-ga!”

20140119-225838.jpg

That’s it. Three ingredients. If this salad could talk it would say, “I am what I am and that’s all that I am. Or all that’s in me.”

You could also dump (Sorry. Couldn’t resist) in the optional ingredients at this point. But be warned that most kids don’t like the extra ingredients.

Now go rescue Olive Oil take a nap. Cause that was exhausting.

“A-ga-ga-ga-ga-ga!”

Pioneer Woman’s Chicken Spaghetti

When I told my kids I was making this dish, they got very excited. My daughter, for all of the wrong reasons.

You see, she thought I was making regular marinara spaghetti (her favorite), but with chicken in it. So, you can understand why this would be a disappointment to her when a white creation gets set down in front of her instead of a red marvel from her dreams.

But the rest of us?

Well, we can’t stop thinking about it.

20140112-223313.jpg

I first made this recipe about a year ago. I am going to be honest. I thought it was good, but I just wanted to tweak it a bit. You see, I always make a recipe the first time, exactly the way it is written down. I think that is only fair.

After that, I will either leave it alone. Or play with it.

For this recipe, I thought it needed just a few adjustments.

First, I wanted to make it easier.

Second, I wanted a tad more flavor.

Third, I have to have my vegetables cooked in a casserole. I cannot stand crunchy onion.

Fourth, I love the Pioneer Woman. This is still entirely her creation. I just changed it a tiny bit.

Ingredients:

Diced chicken meat from one rotisserie chicken
1 1/2 cups chicken stock
1/3 cup reserved water from boiling noodles
1 minced clove garlic (or 1 handy dandy frozen packet)
1/4 cup diced onion
1 diced green bell pepper
1 package of spaghetti noodles
1 can cream of mushroom soup
1 can cream of chicken soup
1/4 tsp salt + 1/2 Tbsp. to salt the water the spaghetti noodles cook in
1/4 tsp. ground black pepper
1/8 – 1/4 tsp. ground cayenne pepper
3 cups grated sharp cheddar cheese
1 jar pimentos
1 tsp. Lawry’s seasoned salt
1 tsp. knorr’s chicken seasoning
1/4 tsp. ground cumin
1/4 tsp. ground paprika
1 Tbsp. Butter
2 Tbsp. Olive oil

Optional:

Broccoli

Preheat oven to 350 degrees or 325 degrees convect bake.

Cut chicken up from rotisserie chicken. Set aside.

In a stockpot, boil water. Break up spaghetti noodles into small pieces (about 1/3 their original size). Add 1/2 Tbsp. salt to the boiling water. Add noodles to the pot of boiling water. Cook according to al dente directions on noodle package. Carefully reserve 1/3 cup boiling water before draining.

20140112-223453.jpg

In a large skillet or dutch oven, heat butter and olive oil. Add onion and green bell pepper and sauté over medium low heat for approximately 8 minutes until softened but not brown. Add garlic and sauté one minute. Add pimentos and cook for one minute. Turn off heat.

20140112-223557.jpg

Add drained spaghetti noodles, chicken, all of the seasoning & spices, chicken stock, reserved 1/3 cup boiling water, the 2 soups, and 2 cups of the shredded cheese (if you are adding broccoli, and I sometimes do, steam it in the microwave. Do not overcook it! It will be a soggy mess in the casserole. I’m not going to say how I know this. ; ). Then add the broccoli during this step, too) to the vegetable mixture. Stir until very well combined.

20140112-223649.jpg

Pour mixture into casserole dish (if you do not care about it being pretty. You can just leave it in the dutch oven as long as your dutch oven is oven-safe). Top with remaining 1 cup of cheese.

20140112-223958.jpg

Put the casserole into the oven and bake for 30-35 minutes until cheese is melted and the edges are beginning to bubble.

20140112-224032.jpg

Remove the casserole from the oven with oven mitts. Turn off the oven. Serve onto plates and eat up! That reminds me…

While I was adding a few spices to tweak this recipe, I made it twice in one week.

When I told my daughter I was making it again, she responded in jest,

“It’s not really spaghetti! I will not fall for your lies again!”

I hate to say this, and please do not tell her I said this, but she’s right.

Shhhhhh.

It’s not spaghetti.

It’s heaven.

P.S. I shared this on Savvy Southern Style.

And My Romantic Home.

Holiday Spaghetti Wreaths

20131217-220105.jpg

It wouldn’t be Christmas without spaghetti. Wait. What?

Let me start over.

It wouldn’t be Christmas without me trying to make some kind of crazy fun dish that the kids can remember. This one beats tuna fish sandwiches dyed red and green…

But just by a bit. ; )

I wanted to do something special with my leftover spaghetti the other night. Well, as special as leftover spaghetti can be. With Christmas here, I had a fun idea. I wanted to make individual Christmas wreath ramekins filled with…spaghetti leftovers.

Frugal and fun?!

Happy day!

20131217-215548.jpg

Ingredients:

Leftover spaghetti (I would say this is 2 jars pasta sauce with 1/2 pound cooked ground meat, 1/2 package spaghetti noodles)
1/8 tsp. crushed red pepper flakes
1/2 diced red bell pepper
1/4 cup red wine
3 Tbsp. Olive oil
1 clove of minced garlic (I use 1 tablet from frozen packet)
1/2 block (4 Tbsp.) softened cream cheese
1/2 of a real mozarella cheese ball sliced into 1/2″ slices

Topping:

5 Tbsp. Butter
1/2 cup + 2 Tbsp. Bread crumbs
1/4 tsp. italian seasoning

Optional:

Anything green to use as filler on plate around your round ramekin. I used broccoli. It makes another pretty wreath.

Preheat oven to 350 degrees.

20131217-215638.jpg

In a small bowl, mix up your melted butter, bread crumbs and italian seasoning.

I sautéed my bell pepper in the olive oil for approximately seven minutes. Then I added the garlic and cooked the mixture for another minute. I added the wine and let that simmer for a minute.

20131217-215858.jpg

I mixed the cream cheese, leftover spaghetti sauce and noodles, and bell pepper mixture together. I plated the ingredients into individual round ramekins.

20131217-215825.jpg

20131217-220018.jpg

I placed a slice of mozzarella cheese on top. Then I placed the bread crumbs into a circle around the cheese.

20131217-222327.jpg

Place the ramekins onto a baking sheet and bake for 20-25 minutes until cheese is melted.

Turn oven to broil. Broil for approximately one minute until bread crumbs are golden brown. Be careful! You do not want your cheese to burn!

20131217-221835.jpg

Serve up on plates.

20131217-221129.jpg

You can also add an additional wreath of green vegetables of your choice around the ramekin for an extra wreath layer. And an extra opportunity to fill your kids tummies (or your own) with an extra vegetable.

I won’t tell if you don’t.

Enjoy!

Tangy Biscuits

20131029-214902.jpg

I read an article in Country Living Magazine about the most amazing looking biscuits. I knew I had to try them. This is not my recipe and I did not change it one bit. So I am not posting the full directions. To see the super easy directions, click here.

I have made biscuits before. But I cannot remember them being this simple. I am now sold on making them from scratch.

But only with this recipe.

This biscuit is tangy through the incorporation of cream cheese and buttermilk. I made it two times in the last week. Once with parchment paper in a pan. Another time in my cast iron skillet. The skillet was easier and the biscuits got a nicer color with it. This is the method I would recommend. For some reason, the first time I made these I got ten biscuits from the dough. The second time, 12.

Ingredients

2 cups of self rising flour (plus more to sprinkle when rolling out and on top)
1/2 stick softened salted butter cut into small pieces
1/2 stick (1/4 cup) softened cream cheese cut into small pieces
3/4 cup buttermilk (Mine was room temperature)
1 Tablespoon melted butter

20131029-214953.jpg

20131029-215028.jpg

20131029-215109.jpg

20131029-215201.jpg

20131029-215236.jpg

20131029-215322.jpg

20131029-215402.jpg

This is what I went through to make my biscuits.

20131029-215520.jpg

20131029-215547.jpg

Whenever I serve any type of bread or roll, I usually place the pieces in a bowl draped with kitchen towels. This keeps the bread dry and warm. Plus, I just think it adds a pretty rustic touch on the table.

I did not have a square cutter, so I just used a plain old biscuit cutter. I mentioned above that the first time, I used parchment paper in a baking dish. This worked out fine. My biscuits ended up taking 19 minutes to cook with the parchment method. And 17 minutes in the skillet method.

This was so easy. Probably five minutes to make, roll out, and cut. And then it is just the baking time.

Enjoy! Please let me know if you try these. My family adored them.

* Also, I do not know how long they keep their recipes up. If you like these, I would print it just in case.

I have to eat my biscuits with a bit of jelly and no butter. Although, my grandmother would be so ashamed. She loved butter on her biscuits. And, of course, honey. How do you like yours?

I shared this on Savvy Southern Style

And My Romantic Home