Pioneer Woman’s Chicken Spaghetti

When I told my kids I was making this dish, they got very excited. My daughter, for all of the wrong reasons.

You see, she thought I was making regular marinara spaghetti (her favorite), but with chicken in it. So, you can understand why this would be a disappointment to her when a white creation gets set down in front of her instead of a red marvel from her dreams.

But the rest of us?

Well, we can’t stop thinking about it.

20140112-223313.jpg

I first made this recipe about a year ago. I am going to be honest. I thought it was good, but I just wanted to tweak it a bit. You see, I always make a recipe the first time, exactly the way it is written down. I think that is only fair.

After that, I will either leave it alone. Or play with it.

For this recipe, I thought it needed just a few adjustments.

First, I wanted to make it easier.

Second, I wanted a tad more flavor.

Third, I have to have my vegetables cooked in a casserole. I cannot stand crunchy onion.

Fourth, I love the Pioneer Woman. This is still entirely her creation. I just changed it a tiny bit.

Ingredients:

Diced chicken meat from one rotisserie chicken
1 1/2 cups chicken stock
1/3 cup reserved water from boiling noodles
1 minced clove garlic (or 1 handy dandy frozen packet)
1/4 cup diced onion
1 diced green bell pepper
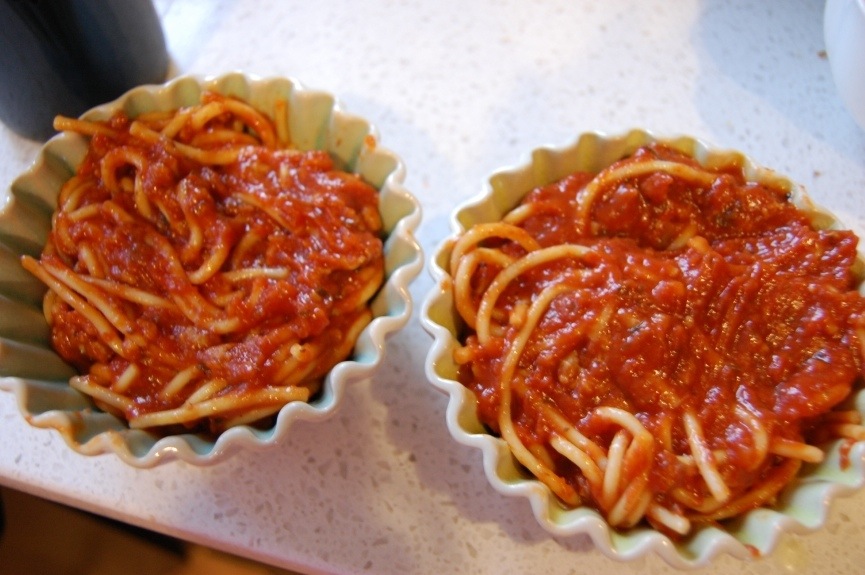
1 package of spaghetti noodles
1 can cream of mushroom soup
1 can cream of chicken soup
1/4 tsp salt + 1/2 Tbsp. to salt the water the spaghetti noodles cook in
1/4 tsp. ground black pepper
1/8 – 1/4 tsp. ground cayenne pepper
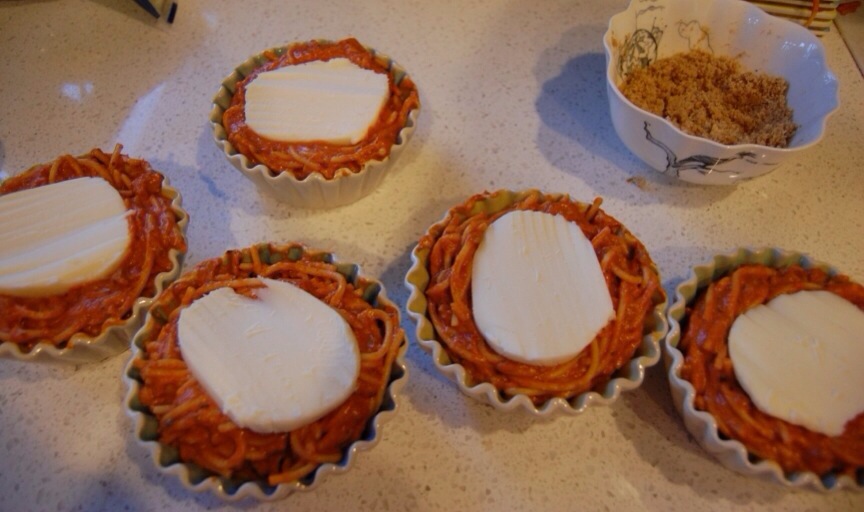
3 cups grated sharp cheddar cheese
1 jar pimentos
1 tsp. Lawry’s seasoned salt
1 tsp. knorr’s chicken seasoning
1/4 tsp. ground cumin
1/4 tsp. ground paprika
1 Tbsp. Butter
2 Tbsp. Olive oil

Optional:

Broccoli

Preheat oven to 350 degrees or 325 degrees convect bake.

Cut chicken up from rotisserie chicken. Set aside.

In a stockpot, boil water. Break up spaghetti noodles into small pieces (about 1/3 their original size). Add 1/2 Tbsp. salt to the boiling water. Add noodles to the pot of boiling water. Cook according to al dente directions on noodle package. Carefully reserve 1/3 cup boiling water before draining.

20140112-223453.jpg

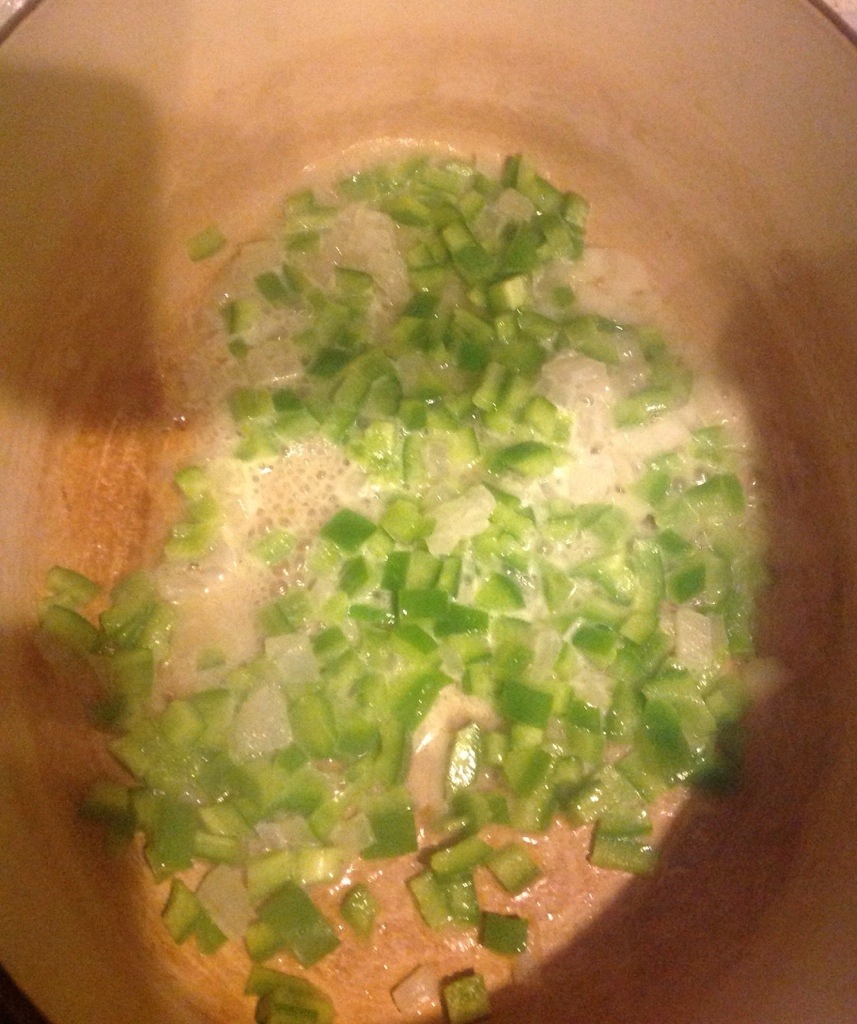
In a large skillet or dutch oven, heat butter and olive oil. Add onion and green bell pepper and sauté over medium low heat for approximately 8 minutes until softened but not brown. Add garlic and sauté one minute. Add pimentos and cook for one minute. Turn off heat.

20140112-223557.jpg

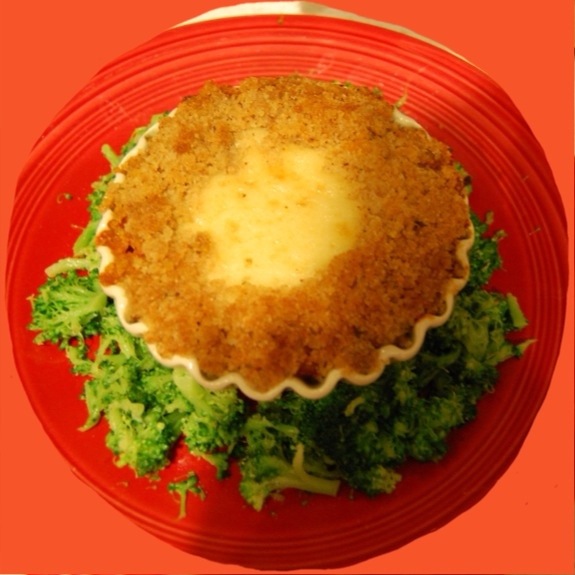
Add drained spaghetti noodles, chicken, all of the seasoning & spices, chicken stock, reserved 1/3 cup boiling water, the 2 soups, and 2 cups of the shredded cheese (if you are adding broccoli, and I sometimes do, steam it in the microwave. Do not overcook it! It will be a soggy mess in the casserole. I’m not going to say how I know this. ; ). Then add the broccoli during this step, too) to the vegetable mixture. Stir until very well combined.

20140112-223649.jpg

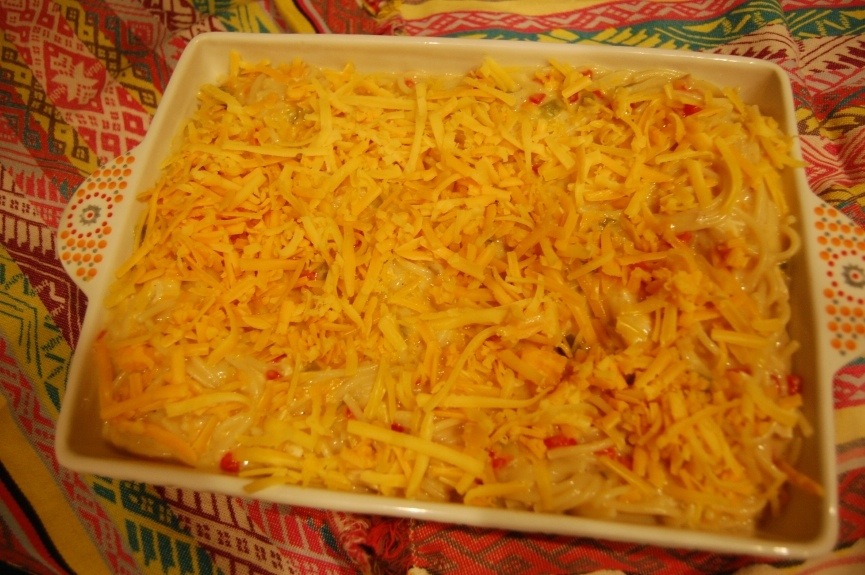
Pour mixture into casserole dish (if you do not care about it being pretty. You can just leave it in the dutch oven as long as your dutch oven is oven-safe). Top with remaining 1 cup of cheese.

20140112-223958.jpg

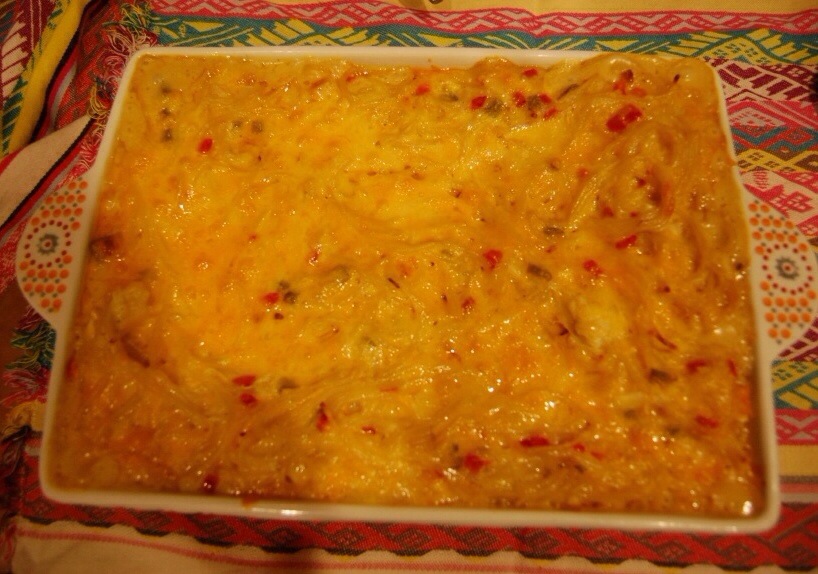
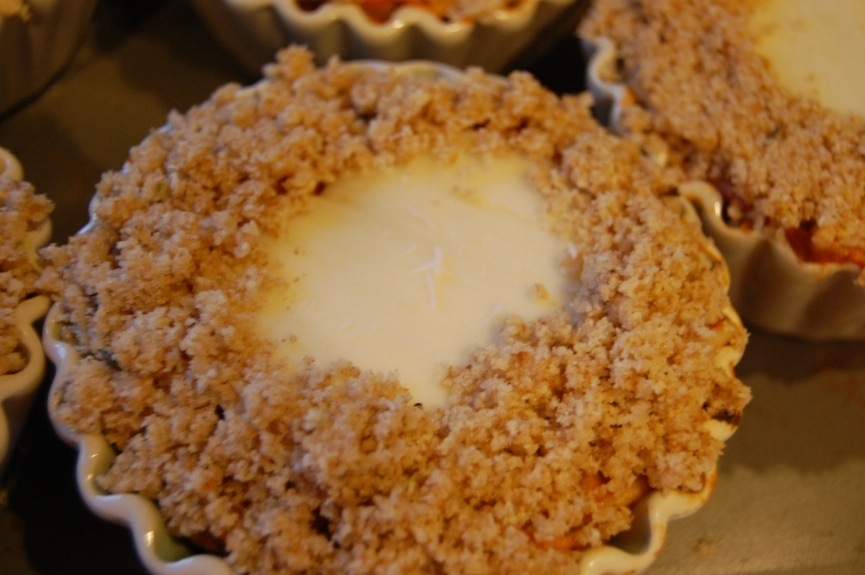
Put the casserole into the oven and bake for 30-35 minutes until cheese is melted and the edges are beginning to bubble.

20140112-224032.jpg

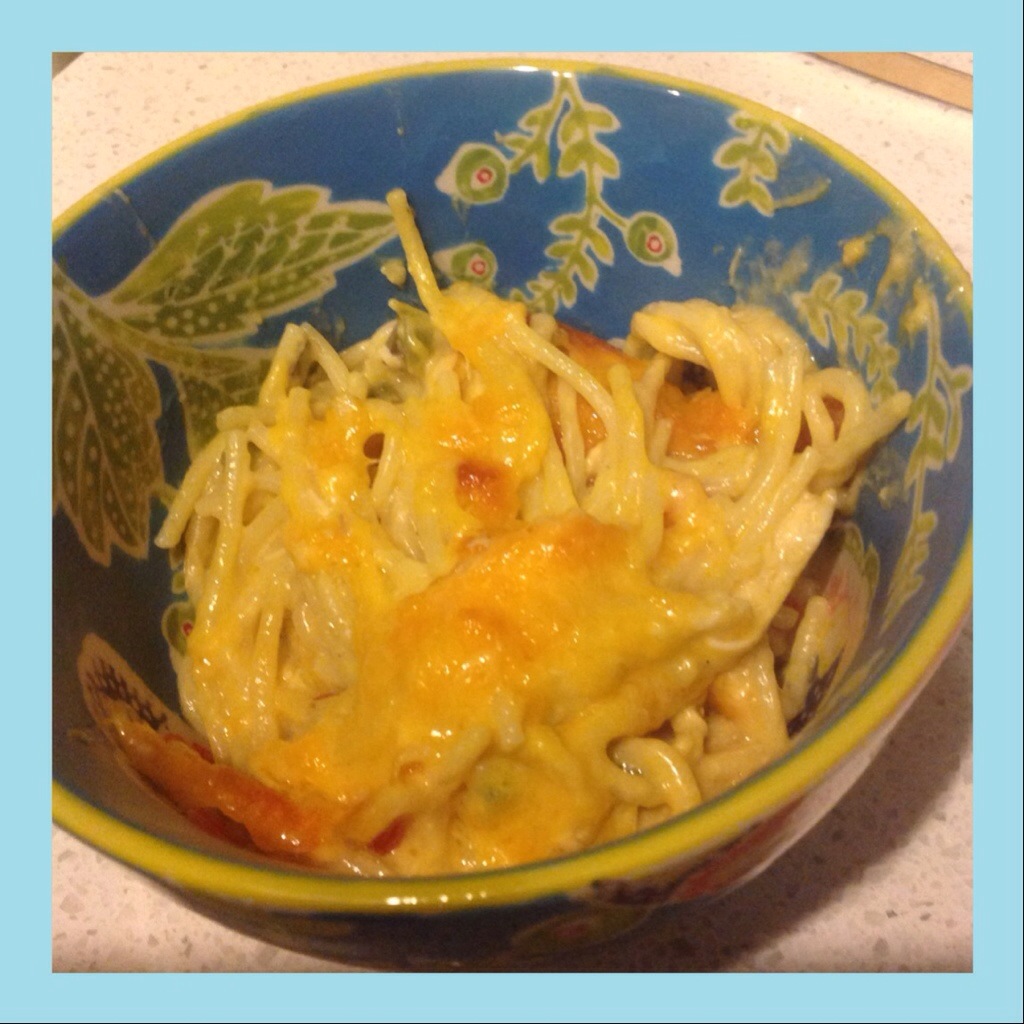
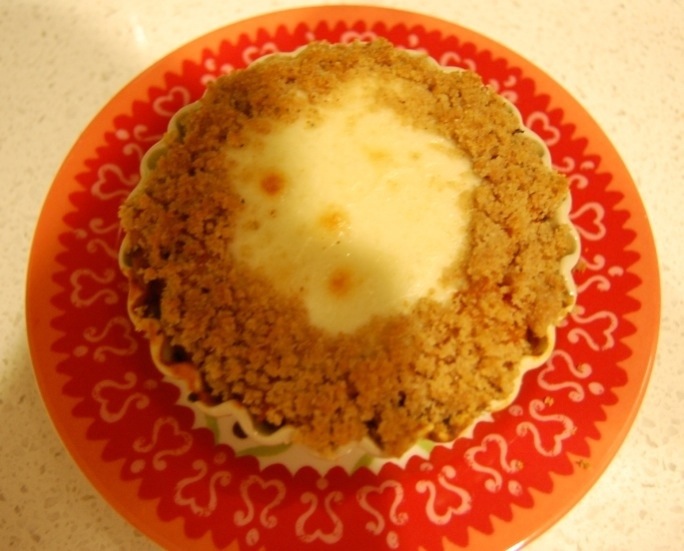
Remove the casserole from the oven with oven mitts. Turn off the oven. Serve onto plates and eat up! That reminds me…

While I was adding a few spices to tweak this recipe, I made it twice in one week.

When I told my daughter I was making it again, she responded in jest,

“It’s not really spaghetti! I will not fall for your lies again!”

I hate to say this, and please do not tell her I said this, but she’s right.

Shhhhhh.

It’s not spaghetti.

It’s heaven.

P.S. I shared this on Savvy Southern Style.

And My Romantic Home.

It’s The Little Things: Pie Crust Cookies

20140108-232602.jpg

I have been really sick. How sick? Well, I have not had a glass of wine since Christmas. That’s how sick. I know. Who knew it was possible? It has been thirteen days of a cold with a fever and I am now beginning to think it is time to see a doctor.

Or not.

We’ll see.

It makes for interesting dreams.

But in the meantime, my sweet mother brought me over the nicest gift in the world. It was a container of pie crust cookies.

20140108-232636.jpg

Pie crust cookies happen to be my most favorite thing in the whole wide world. My mother and grandmother used to make them all through my childhood. They start with homemade pie crust dough (which is why I never make them). The pie crust dough is rolled out then generously sprinkled with cinnamon and sugar. Then cut into long irregular shapes, punched with a fork, and put into the oven to bake. Hence the clever name, “pie crust cookies.” I don’t know where or how they came up with that.

When she delivered these, I almost cried in my delirious state.

They have been what has kept me going these last few days.

Well, that and a glorious little product called heaven Sudafed.

Have you ever had these delightful little treats? And why does everything taste so much better when your mom makes it? What’s your favorite thing to have when you are sick? Spaghetti for some reason also always makes me feel better. It is what we are having for dinner tonight.

It’s the little things: anything that makes you feel better when you are sick.

Thanks Mom.

Holiday Spaghetti Wreaths

20131217-220105.jpg

It wouldn’t be Christmas without spaghetti. Wait. What?

Let me start over.

It wouldn’t be Christmas without me trying to make some kind of crazy fun dish that the kids can remember. This one beats tuna fish sandwiches dyed red and green…

But just by a bit. ; )

I wanted to do something special with my leftover spaghetti the other night. Well, as special as leftover spaghetti can be. With Christmas here, I had a fun idea. I wanted to make individual Christmas wreath ramekins filled with…spaghetti leftovers.

Frugal and fun?!

Happy day!

20131217-215548.jpg

Ingredients:

Leftover spaghetti (I would say this is 2 jars pasta sauce with 1/2 pound cooked ground meat, 1/2 package spaghetti noodles)
1/8 tsp. crushed red pepper flakes
1/2 diced red bell pepper
1/4 cup red wine
3 Tbsp. Olive oil
1 clove of minced garlic (I use 1 tablet from frozen packet)
1/2 block (4 Tbsp.) softened cream cheese
1/2 of a real mozarella cheese ball sliced into 1/2″ slices

Topping:

5 Tbsp. Butter
1/2 cup + 2 Tbsp. Bread crumbs
1/4 tsp. italian seasoning

Optional:

Anything green to use as filler on plate around your round ramekin. I used broccoli. It makes another pretty wreath.

Preheat oven to 350 degrees.

20131217-215638.jpg

In a small bowl, mix up your melted butter, bread crumbs and italian seasoning.

I sautéed my bell pepper in the olive oil for approximately seven minutes. Then I added the garlic and cooked the mixture for another minute. I added the wine and let that simmer for a minute.

20131217-215858.jpg

I mixed the cream cheese, leftover spaghetti sauce and noodles, and bell pepper mixture together. I plated the ingredients into individual round ramekins.

20131217-215825.jpg

20131217-220018.jpg

I placed a slice of mozzarella cheese on top. Then I placed the bread crumbs into a circle around the cheese.

20131217-222327.jpg

Place the ramekins onto a baking sheet and bake for 20-25 minutes until cheese is melted.

Turn oven to broil. Broil for approximately one minute until bread crumbs are golden brown. Be careful! You do not want your cheese to burn!

20131217-221835.jpg

Serve up on plates.

20131217-221129.jpg

You can also add an additional wreath of green vegetables of your choice around the ramekin for an extra wreath layer. And an extra opportunity to fill your kids tummies (or your own) with an extra vegetable.

I won’t tell if you don’t.

Enjoy!

Chocolate Pie

20131202-152218.jpg

I am a pie girl. I love it. I like how pretty it looks when it comes out of the oven. The smell of it cooking. This is my first sweet pie I have posted. I have done three savory pies: chicken pot pie, tuna pie, and sloppy joe pie. I kind of want to eat them all. Right now. Yum!

20131203-173733.jpg

Speaking of which: I made a tuna pie tonight. Excuse my diversion, but isn’t she perty?

20131203-185129.jpg

Oh! And for dessert, I made a pistachio pudding pie. So, when I do not fit into any of my clothes next week, please just whisper one torturous word into my ear: “pie.”

Notice: “pie” rhymes with “thigh.” Coincidence?

I think not.

Excuse me while I “cry.”

20131203-185459.jpg

Anyhoo, we’re talking about chocolate pie. Here it is: the chocolate pie I grew up with. The one that no other chocolate pie has ever stood up to. I had stopped making this pie for many years. It made me sad to make it. It was my uncle’s favorite thing at the holiday meal. I remember how excited he would be about it. He passed away a few years ago and I just could not bring myself to make or eat this pie. But a few months ago, The Pioneer Woman made a very similar pie. And it made me want to make my family’s pie again. I wanted a new generation to enjoy it. My uncle would have been happy about it.

There was only one problem. I could not find the recipe. Surprise!

I called my sister for it. “We just use your recipe,” she said. I assured her she was incorrect. I’ve always used our mom’s recipe.

I called my mom. She replied with, “Sweetie, we use your recipe.”

At this point, I was feeling more than slightly crazy (well, more than usual).

“Mom, I use your recipe.”

“No, honey. Remember when you changed it with Egg Beaters?”

Awwww. Now it made sense. Years ago, I had changed my mother’s recipe to use Egg Beaters instead of raw eggs and now it was “my recipe.”

I happily got “my recipe” from her.

I made it for Thanksgiving. It was a huge hit. I went home. The next day I made another pie for our family. This is because a day without pie for lunch is no day you want to be a part of. Again for lunch, not with lunch. Big difference.

20131202-151001.jpg

Ingredients:

1 cube (8 Tbsp.) softened salted butter
2/3 cup Egg Beaters or you could use 3 pasteurized eggs
1/4 cup chocolate chips
2 squares or 1 oz. unsweetened chocolate (4 small rectangles if it comes like that.)
3/4 cup of sugar
1/2 tsp. vanilla
1 pie shell (I use Pillsbury. My mom always made her own. But this is my recipe, so we take shortcuts.)

Optional:

Whipped cream for topping individual slices

Preheat oven to 425 degrees or 400 degrees convect bake.

In a pie dish, lay your pie crust. Crimp the edges. Pierce the bottom and sides several times with a fork. If you are scared of shrinkage (mine always shrinks a little, but it doesn’t bother me), you can line your pie sheet with foil and beans or marbles to weigh it down. I never do this. But you could if you are not as lazy as me. It does not affect the taste one bit.

Bake for twelve minutes.

Remove the pie pan from the oven. Turn off the oven. Let pie shell cool completely (I usually wait one hour before moving on to the next step). If you added marbles or beans with foil, now would be the time to remove all of that (after it is cooled). This might seem obvious, but I am a maker of a chocolate pie recipe I did not know was mine. Therefore, I have lost my marbles. I do not want you to eat yours.

20131202-151220.jpg

Melt chocolate chips and unsweetened chocolate in a small bowl in the microwave for thirty second intervals. Stir. Keep repeating until chocolate is completely melted.

20131202-151259.jpg

20131202-151331.jpg

In a mixer or with a hand mixer (be warned if you are using this method, you will be mixing for 17 minutes. I guess you could think of it as working off chocolate pie calories), mix together sugar and butter for one minute. Add Egg Beaters and beat on medium high speed for three minutes.

20131202-151525.jpg

Turn mixer to low and very slowly start drizzling in the melted chocolate. After all of the chocolate is incorporated, scrape sides, and turn mixer to high. Mix for 10-15 minutes. I usually do thirteen minutes. This is the extent of my patience. I can not wait longer than thirteen minutes for anything.

It’s called being a grown up.

20131202-152411.jpg

Pour the chocolate heaven mixture into the pie shell. Carefully cover pie without touching the covering to the filling (if this happens, you will have to explain to the surgeon why your stomach is full of foil. Nobody got time for that). Refrigerate until ready to serve. This needs to refrigerate at least three hours before serving.

20131202-152251.jpg

Lunch is ready! Enjoy!

* Update: Lovely Lisa just asked me about whipped cream. You can absolutely top your slices with that airy heaven. Most of my family does! Thanks Lisa! : )